Hey fellow backyard bowyers! Here is a list of the materials (plus links to a couple big box stores) needed to build the hot box as well as some layout drawings. There's one for cutting the 4'x8' drywall panel into all the box panels, one for the light panel, and one for hole placement on the cover of the box.
Materials:
(1) One 4'x8' drywall panel, 1/2" thick - Home Depot, Lowes
(1) One roll of foil tape* - Home Depot, Lowes
Aluminum foil, enough to patch wide panels. * Can be substituted for extra foil tape, expect to use one roll plus some.
(3) Three porcelain lamp holder/ceiling sockets (don't get plastic) - Home Depot, Lowes
One 6' long, 16 gauge extension cord - Home Depot, Lowes
My ideal light setup for fast heat yet stable temperature.
(2) Two 250 watt heat lamp bulbs - Home Depot, Lowes
(1) One 150 watt incandescent bulb - Home Depot, Lowes
Total price for box (with switch)
Home Depot = $47.11, Lowes = $41.20
I managed to build one box from second-hand hardware store and garage sale parts for under $20. Like anything else, you end up trading time for money, but it can be done pretty cheaply.
Layout for 4'x8' drywall panel. Measurements are in inches.
Layout for the holes on box cover. Measurements in inches.
My favorite thing about selfbowyery has always been the tillering process. This is where the spirit of a bow lies. It's a vital process that in the end determines what a bow will be like, how it will handle, how it will shoot, and ultimately how long its life will be. It's easily the most important part of building a bow.
The problem with tapering PVC pipe is that this process pretty much takes care of itself. Because of this, a PVC bow's spirit lies in the details, the degree of taper, the reflex and deflex, the recurves and siyahs, and all the other things that can be done to a PVC bow once tillered. As a result, my favorite part of PVC bowyery has become what happens after the taper, not tapering itself.
While there are ways to taper a bow completely by hand, using a jig to flatten my bows has become standard for me. It's the one process I care the least for and one I've tried to speed up or automate for some time. A heat gun, my tool of choice, is quick and fairly efficient, but it requires your undivided attention to get good results. The goal for me was to build something or find a technique that heated a pipe to the perfect temperature for flattening without risk of overheating and without active participation.
I tried many things. Of them, heating through another medium was always the easiest but always frustrated me. Boiling water is only hot enough to bring PVC pipe to the lower range of its ideal temp making getting the pipe to jig frustrating with little working time. Sand and other particulate mediums worked but dealing with hot sand in a quick, low-involvement way always seemed too involved. Steam worked, but the quick cooling time always became more detrimental than helpful.
So I turned to dry heat. I built various hot-boxes and ovens, even a dedicated kiln. The ones that worked worked amazingly well, heating a pipe quickly and without a need to actually do anything aside from putting the pipe in and taking it out. They all worked, though realistically they were way too expensive and some of them were hardly safe. And while I used the best ones for a while, replacing coils and refilling tanks sort of just killed the fun of building bows. I scrapped the idea, going back to the heat gun after all.
My first successful foam board hot box that didn't melt.
A few months ago I had the idea sparked again. After following a lead that ultimately became a dead-end, I remembered something. A few years ago I went into a laminated bow kick and had built a simple hot-box. It was crude but it worked and it was cheap. It used light bulbs for the heat source, and while I never got it hotter than 200 degrees, it made sense. It was a start.
I started out building a simple box made of insulating foam board based on Sam Harper's hot box from PoorFolkBows.com. After playing around with a couple of them, I halved the design making it cheaper and more efficient for what I needed. After literally melting a couple boxes, I finally came up with one that worked and cost less than a good heat gun. The final touch came from my dad and my friend Ken, a new PVC bowyer. After replacing the $15 foam board with a $10 drywall board I had a solid prototype that worked well, was inexpensive, and wouldn't melt. It was also sturdy enough to be used as a table for flattening jigs.
The final PVC bow hot box in all its glory!
After refining the design, I came up with the box you see above. It's very simple, yet works really well for heating multiple pipes at once evenly and quickly. It takes less than 6 minutes to heat most PVC pipes till they can be flattened yet it holds the pipe below its melting point, almost eliminating the chance of overheating. It's simple and can be built with minimal tools and minimal experience. With a few simple additions like a dimmer switch and thermostat, the box's temperature would be controllable and exact. And another plus is that the box is silent, unlike the heat gun or other forced-air hot boxes.
There are many styles of quiver out there, of them my favorite style is the side quiver or side-draw quiver (not to be confused with the hip or belt quiver, also known by the same name). Unlike most quivers that are drawn from the top, the side-draw quiver is similar to quivers that make use of a hood and separate arrow gripper like bow-quivers in that the arrow is drawn from the side of the quiver. It is something of a hybrid in this regard, as most designs still allow arrows to be drawn from the top of the quiver if the need arises.
I recently received a new quiver from Tommy Hard of Upshot Archery, one of his own takes on the side-draw quiver style. It has since become my daily use quiver as it has just about everything I look for in a good quiver and easily modified to be the perfect quiver for all situations.
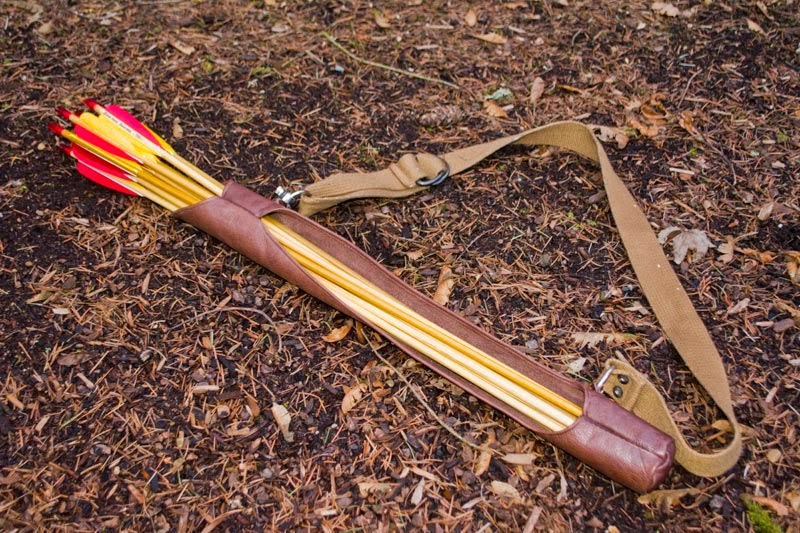
Upshot Archery's side-draw quiver can hold up to a dozen field-tip arrows comfortably.
My first impression of the quiver is that it is very lightweight. I was actually surprised that it is completely unstructured, meaning that it simply falls limp without arrows to support it. At first I thought this was a bit strange, but the flexible nature of the quiver allows it to contour to the body better than a more rigid quiver. This also allows the quiver to be folded up for storage. It was actually shipped to me folded neatly and securely in a box.
The quiver folded up for storage. The arrow has 4 inch feathers to give an idea of scale.
The quiver is 24 inches long overall with a 16 inch long cut-out on the side and a 3-1/2 inch deep cup at the bottom. It has an inner diameter of around 2-1/2 inches which holds a dozen arrows with target or field points comfortably as well as about 4-6 arrows with broadheads. I can usually get about 4 Judo or similar blunts and 6 rubber blunts to fit comfortably.
The quiver's cup is deep enough to keep broadheads safely tucked away yet shallow enough to allow identification of points by feel. This is great when carrying both blunts and broadheads. The cup is deep enough to fit a cylinder of foam, a great way to prevent arrow rattling and to add extra safety when carrying broadheads.
The Upshot Archery quiver holds about 4-6 arrows with broadheads comfortably.
Made from thin upholstery leather, the main body of the quiver is very light. The strap is a canvas belt and is fully adjustable as well as easily removeable. The quiver features heavy steel rings for strap attachment as well as a spring clip for clipping the quiver to a belt or pocket as well as a way to keep the quiver secure in a treestand or at camp. It can also be used to hold an extra shooting glove or tab, or to keep items with the quiver when in storage.
Heavy steel rings offer a solid attachment point for straps. The spring clip is great for attaching the quiver to just about anything.
While meant to be used as a side quiver, this versatile quiver can also be worn on the back, under the bow arm, on the hip, over a shoulder, or slung to the side. While removing arrows is effortless, the unstructured nature of the quiver can make putting arrows back a little awkward at first. This gets easier with practice.
D-rings on the strap allows for easy adjustments while keeping those adjustments fairly well.
The strap is fully adjustable with two D-rings that can be moved easily to make quick adjustments. While they can sometimes slip if the quiver gets snagged, they still are fairly secure. The strap has two snap closures on one end, making removing the included strap easy if you wanted to replace it. One thing to note is that the strap is made to fit most archers. If you have a broad chest and shoulders like I do, you will need to request a longer strap for the quiver to fit comfortably.
The bottom of the strap has two snap closures for quick strap removal. This can be useful if the strap gets caught and the quiver needs to be dropped.
Overall, the quiver is constructed well. It is solid and made of upholstery leather and sewn with a thick nylon thread. The seams are all solid, though there are some minor aesthetic imperfections that do not take away from the usefulness of the quiver. The metal furniture is also solid and comes in a variety of finish options. The leather used also comes in a variety of colors and is available in both new and recycled leather. This particular quiver is made from recycled leather.
Tommy makes his quivers in both right and left hand models. The leather loops that hold the steel rings for the strap in place will be placed differently for right and left handed shooters. This points the cut-out in the direction of your arrow-holding hand, making drawing an arrow very comfortable. While not as versatile as a top-mounted strap design, this style is more comfortable, giving the quiver a better fit to the individual and a more custom feel.
While not padded, the soft suede interior helps to keep rattling down, though feathers and vanes still have a tendency to make some noise. This can easily be quieted by adding a strip of faux or real fur to the inside of the quiver's top opening.
This right handed quiver has the loops sewn off to one side. A left handed quiver would have the loops on the other side.
All-in-all this is a great quiver. A good side-draw quiver is often hard to find, especially at this price point. This handmade quiver is constructed well and feels very durable. In short, I recommend this quiver to anyone looking for a versatile and adjustable quiver. It's perfect for all kinds of shooting, especially where range of movement is limited. With a few tweaks it can make a perfect lightweight quiver for hunting as well.
The design is well-planned out and versatile, the construction is solid, the fit and finish is not perfect but still very good, and the price is very reasonable for a handmade quiver. Tommy also offers custom orders as well as pre-made quivers available. You can check them out here!
There have been a lot of questions regarding the speed of PVC bows. There seems to be a huge misconception, largely based on my own videos, that PVC bows are really slow. It's my own fault. In an effort to be fair and conservative, almost all of the speed tests done of my channel have been with 10gpp (grains per pound) arrows.
While most archers shooting selfbows and some shooting longbows use this measure, the rest of the archery world tends to use lighter arrows to measure bow speed. This usually results in higher speeds. For example, a bow's AMO (Archery Manufacturers Association, now Archery Trade Association) speed is based on a 60 pound (maximum) at 30 inch bow shooting a 9gpp arrow. I won't get into it now, but those extra two inches of draw will raise a bow's efficiency (a 60 pound at 30 inch bow will be faster than an identical bow that's 60 pounds at 28 inches if both shoot the same arrow). The IBO (International Bowhunting Organization) method measures speed based on a 70 pound (maximum) at 30 inch bow shooting a 5gpp arrow.
Compared to my tests of bows drawn to 28 inches and shooting 10gpp arrows, the AMO and IBO speeds will be much, much higher. Most times manufacturers of bows will put speeds on bows based on using a lighter than 10gpp arrow. All of this combines to make the speeds I get from the bows I've tested seem really slow. In an effort to help dispel the myth that PVC bows are slow by default, I'm going to start testing not only by my 10gpp standard, but also with lighter and heavier arrows to show what PVC bows are capable of.
So all of this brings us to the topic of the day. Two bows, each built by an independent PVC bowyer, two different pipe diameters, both 45 pounds at 28 inches, and both have a similar unstrung and braced profile (if you don't count the snakey curves). Which will reign supreme as most efficient? Will it be the lightweight 3/4" bow built by Bruce Laberdee? Or will it be the heavyweight 1" bow built by Ken Nyholm? We shall see.
The first step to finding a bow's efficiency is to first figure out how much energy it is storing in its limbs. The easiest way to do this is to measure the bow's weight at every inch of draw. The resulting measurements, when laid out on a chart, create what is known as an F/D (force/draw) curve. By taking the numbers under the curve, or all the weights at every inch combined, you get the bow's energy storage in inch-pounds. Divide that by 12 and you get the bow's storage in foot-pounds.
Here are the F/D curves for both bows. Both bows store about the same amount of energy, though the 1" bow stores slightly more.
After measuring both bows, it turns out the 1" bow actually stores a little more energy. The 3/4" bow stored 37.25 foot-pounds, while the 1" bow stored 39.16 foot-pounds. Now comes the true test: speed. In order to figure out how efficient both bows are, we need to measure speed and then figure out the energy output, or how much energy is actually translated from potential energy to kinetic energy.
After shooting both bows through the chronograph, the 3/4" bow ended up with an average of 164FPS with a 10gpp arrow and the 1" bow ended up with an average of 145FPS with a 10gpp arrow. Already we can see that the 3/4" bow is faster with the same arrow. Now that we know the speed, we can figure out the bow's kinetic energy ((Speed(FPS) X Speed(FPS) X Mass(grains)) / 450,240 = KE(foot-pounds)). The 3/4" bow comes out to 27 foot-pounds, while the 1" bow comes out to 21 foot-pounds. Divide this number by the potential energy and you get the dynamic efficiency. The 3/4" bow comes out on top at 72% efficient, while the 1" bow comes out to only 54% efficient.
So what does this all mean? Basically, it means that the 3/4" bow turns 72% of the energy it stores into kinetic energy to propel an arrow. The 1" bow only converts 54% of its energy, so even though it stored more energy it still ends up with a very low output. But why is that? Why is the 3/4" bow more efficient?
One of the biggest factors here is mass. The 3/4" bow has much less mass than the longer and heavier 1" bow. That means the 1" bow needs to put a lot of energy into moving heavy tips and limbs rather than moving an arrow. Because 1" pipe needs to be made long to achieve the same weights as shorter 3/4" bows, it is already at a disadvantage. While the very short bows do succumb to inefficiency due to being so short and excessive limb travel, they come out on top because a comparable 1" bow will be almost double the physical weight.
The simplest way to make a PVC bow more efficient is to find ways to cut weight. Wooden siyahs, tapered tips, and shaped tips all help bring tip and limb mass down. Another way to make a bow more efficient for its draw weight is to increase early draw weight, which can be done by reflexing and recurving a bow. Making a PVC bow more efficient is a whole post in and of itself.
For those that are looking at speeds, here are the recorded speeds for both bows with different arrow weights (both bows drawn to 28" AMO). One thing to add is that these arrows are at least the weight labeled or higher so if my numbers are off, they are on the slower more conservative side. My lightest arrows were 300 grains, as I don't have anything lighter that I would like to shoot out of these bows. The rest are a little heavier than labeled by a few grains or so.
So what do all these numbers mean? Just to give a little perspective, a good rule of thumb for selfbow speed is that a bow should shoot at least 100FPS plus its own weight with a 10gpp arrow (100 + Bow Weight = Speed in FPS) to be considered a decent performer. So a 45 pound bow should shoot at least 145FPS. So by those standards, even the 1" bow isn't doing too badly. The 3/4" bow is doing very well by those standards, shooting over its weight by about 19 pounds. Most would consider shooting over by 15 FPS to be very good for a selfbow/backed bow. With a lighter arrow, the speeds are higher because the bow's energy is moving less mass. One interesting thing to note is that KE can often be increased slightly by increasing arrow weight, as KE is both a function of speed and mass. Most times I will shoot 10-12gpp arrows because of this.
A bow can be fast but not comfortable to shoot. Personally, the 1" bow is easier to shoot if I'm using fingers. The longer bow has less string pinch as well as virtually no stack at full draw. These make the bow a joy to draw. This 1" pipe bow has some handshock, something that is tricky to get rid of in 1" pipe. On the other hand, the 3/4" bow requires a release of some sort to be accurate because of its string pinch, and the large amount of stack makes bringing the bow to full draw and holding it a struggle. It does, however, have very little handshock with a 10gpp arrow and almost none with a 12gpp arrow.
Ultimately, both of these bows are good bows for different reasons. I believe that what you shoot really should be what feels good to you. It's not all about speed and efficiency. If it were, there would be no selfbowyers, no traditional bowyers at all. Sometimes it's less of what a bow can do, and more of what a bow does to you. It's how it makes you feel and how it fits you. PVC bows aren't right for everyone, but for those that catch the bug, there's nothing better than teaching a plastic pipe to bend with power and grace.
-Nick
P.S. - I'd like to add that you should take my speed tests and any speed tests as they are: tests of speed in a particular situation with certain variables and conditions. The speeds I got in this test only apply to the bow set-ups I tested. If you were to change the bowstrings used, the results would change. If the draw lengths were changed, the results would change. If the arrow weights were changed, the results would change. Even the type of release and how smooth your particular method of releasing is will change the results.
While speed is important, don't rely only on speed as a measure of a bow's capabilities. Also don't rely on manufacturer rated speeds as true speed. If speed is important to you, have your bow tested with your particular set-up and and your comfortable draw length. Be honest and the test won't lie. I've seen guys overdraw their bows to get a nice speed rating and then underdraw their bows when actually shooting. For example, I can get this bow to spit out a 650 grain arrow around 180FPS and a 550 grain arrow at over 190FPS if I draw clear to 32-33 inches. Bring that down to my comfortable shooting length (27.5) and I get more modest speeds of 155FPS and 165FPS respectively. While I can say the bow shoots 190FPS, truth is that any shot I do under normal or stressed conditions will be closer to 165FPS (which I am happy with!). Also be wary of speed ratings without arrow weight or draw length specified.